We live in a time where RV camera technology is commonplace. These tiny devices feature audible sensors that helps prevent you from obstacles. Backup cameras also have a monitor that allows you see your surroundings fully. The aforementioned features enable you backup easily, so you need not worry about backing up your Travel Trailer anymore.
But prior you decision to go out and get a reverse camera, make sure you do a little research. Every backup camera comes with distinctive features based on the price and value. A few of them possess improved screen quality while others come with a more direct installation process.
For instance, maybe you’re in the market and want to buy or browse one, but you have no idea. That is a slight problem and what you need to do is to bear a few things in mind. The first of which is: Video and camera quality, then installation and price.
Travel Trailer Backup Camera Video and Camera Quality
This feature of your backup camera is very important as it helps you see in the night over a large field of view. When going on a journey or to the campground, I suggest you take a camera and monitor to prevent collision with any object. A wireless rear view device that is connected to a split screen monitor, colored, night vision, infrared and black and white options will help in dark areas and is very cool.
If you want, you can also get a camera that has grid lines showing the level to which you can turn and reverse without colliding with anyone and side cameras that assist you in getting a bigger view angle when changing lanes on the road and turning in a narrow space.
Travel Trailer Backup Camera Installation
Except you decide to take your newly acquired backup camera to a specialist for installation, you have to buy one that can be installed easily. Wireless backup cameras tend to be the easiest but have their downsides too like signal interference.
Travel Trailer Backup Camera Price
Finally, you have to consider how much you can put aside to get a backup camera. Know that you will be getting what equals the value of your money. If you prefer a gadget that is very high-tech, can work for years and is sold at a few hundred dollars, you should try it out. But if you have a budget you don’t want to exceed, there’s no problem with that.
Take note that some features may not be present in every model such as night vision and infrared and for some versions, you also need to buy a mounting racket to place your backup camera on properly.
Why you need a Backup Camera for Your Travel Trailer?
Studies by the Department of Transportation claims that “back over” accidents lead to 200 deaths and over 10,000 injuries a year. Due to this, the US government declared a law during 2018 stating every newly purchased vehicle must have backup cameras.
Without these cameras, the rate of liability and collision heightens greatly. Likely outcomes of car crashes includes costly fines, jail time or even lawsuits. To prevent a situation like this, buy and mount a backup camera on your vehicle or travel trailer. Most backup cameras come with helpful features such as clear viewing screens, night vision and audible sensors.
When traveling, you might think your spotter and mirrors is enough but mirrors usually won’t give a wide view. What you most definitely won’t want is to hit anyone particularly small children. Little kids who are unaware of the risk of reverse-driving cars usually walk all over family-friendly places and campgrounds.
Even when you assume there is no one, someone can show up at the last minute. But backup cameras will make you aware of these obstacles in time. Road driving in a travel trailer can turn out a dangerous thing when you’re oblivious of blind spots. Fortunately, backup cameras will help in this situation. Attach it to a reliable power source like running light to transfer power onto it while traveling.
Before you change lanes, look into your backup camera quickly to see if no one is on your path. This will guarantee safety by preventing a deadly collision.
How to Select a Backup Camera for your Travel Trailer
Every individual has their reason for choosing any backup camera they want. It could be affordable or expensive, there are many of them. Irrespective, three primary things should be in mind when selecting the best backup camera for your travel trailer. These are the monitor screen, connection and the mounting platform.
Backup cameras are available in two kinds, wireless and wired. Wired systems have a cable that connects from the camera to the monitor while wireless connections don’t need cord for them to work. Many buyers go for the wireless option because they won’t have to go through the stressful installation.
What you also need to consider is the mounting process. Every backup camera features a particular design that fits certain spaces. The backup camera can be placed undetected beside your driving plate or set obviously at the rear of your travel trailer. How you place it will depend entirely on your convenience and choice.
This factor also influences your monitor choice. Screen size would normally be about 7 inches but this size depends on the brand you get. A bigger size does not indicate greater quality. Rather, take note of the screen’s resolution as higher resolution signifies better clarity. Your gadget’s lux rating will allow you know the level to which it can perform in the dark.
A zero rating indicates complete darkness while one is the light equivalent rating of dusk. Most crashes occur at night when people can see clearly, but upon buying an infrared camera, the possibility becomes very rare.
Another important feature your camera should have is audio monitoring. With the aid of your backup camera, you will be able to perceive vehicles in your blind spots or hear dismantled parts. Bear in mind that this feature can lower your camera’s waterproof capability, so confirm first before buying one.
The brand should outline the IP (ingress protection) rating which signifies the level at which it keeps moisture and debris away. The first 2 digits from 0 to 6 is the rating for dust and dirt protection. The 2nd number from 0 to 8 indicates its resistance to water damage. Overall, a rating of IP66 or IP67 offers the strongest defense.
Best Backup Camera for Travel Trailer
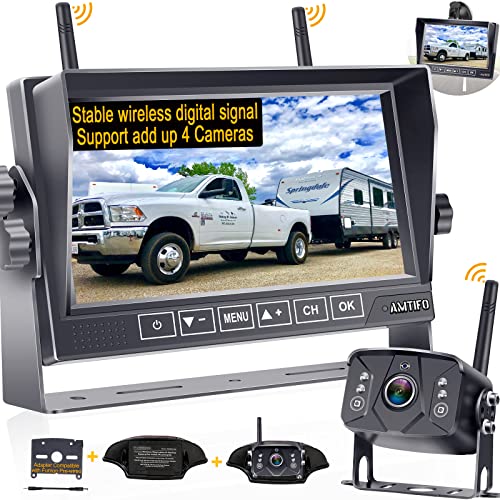
1. AMTIFO A7 HD Backup Camera
[su_button url=”https://www.amazon.com/dp/B078PDH6Z8?tag=bestpickshub1-20&linkCode=ogi&th=1&psc=1″ target=”blank” style=”flat” background=”#ef2d30″ size=”10″ center=”yes”]Check Price on Amazon.com[/su_button]
The AMTIFO A7 HD Backup Camera is a digital wireless camera that comes with a 7″ DVD monitor. It has a top-speed back view observation capability and it’s wireless infrared allows you see at night.
Upon installing the camera, you get a 150 degree angle of view and it’s split screen and stable signal can be interchanged. When reversing, the digital processor HD image of the camera makes you more confident and the recording and playback feature allows you watch carefully and remain safe on the highway whike driving to the campground.
With a high and low temperature resistance of -22 degree Fahrenheit and 176 degree Fahrenheit, the waterproof camera has a waterproof standard of IP69. The image flip feature allows you flip to front view. The upgraded camera has power, a signal dedicated antenna and stability, durability and transmission distance are enhanced by about 50%.
When you combine the camera with a big 7″ display, you will be able to view your surroundings anytime you drive in reverse. At the menu option, you can change the rear view and front view and switch on or off the guidelines which is so simple.
2. Do Honest HD Backup Camera
[su_button url=”https://www.amazon.com/dp/B07FM3YLT5?tag=bestpickshub1-20&linkCode=ogi&th=1&psc=1″ target=”blank” style=”flat” background=”#ef2d30″ size=”10″ center=”yes”]Check Price on Amazon.com[/su_button]
The Do Honest HD Backup Camera is a wireless camera that has a 5 Inch monitor, a tiny RV Bluetooth, Add on-V25 and has a 150 degree real angle of view as well as LCD display technology.
Why you should go for this camera is firstly, it is wireless which allows for easy installation. So, you don’t have to pass the video cable from the back to the front. Bear in mind that the device has to receive power through the reverse light.
It’s stable digital wireless signal provides a clear picture at a balanced working range and with no disruption. This backup camera is very compatible with trucks, vans or vehicles that are below 36 feet. Where there is the need to work with the camera consistently, you should connect it to your driving light.
When you just want to use the camera while reversing, kindly connect it to your reversing light. I suggest you connect a DC 12V power source to your gadget to charge it. By pressing + button, you can change the screen to full or split screen.
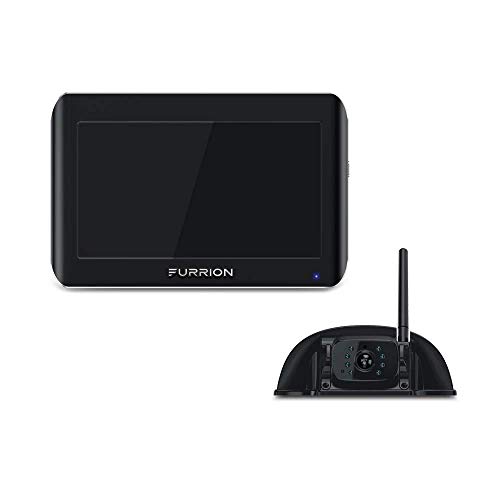
3. Fusion Vision S 7 Inch Backup Camera
[su_button url=”https://www.amazon.com/dp/B07CZ268GT?tag=bestpickshub1-20&linkCode=ogi&th=1&psc=1″ target=”blank” style=”flat” background=”#ef2d30″ size=”10″ center=”yes”]Check Price on Amazon.com[/su_button]
The Fusion Vision S 7 Inch Backup Camera is a wireless camera that has a large viewing angle and infrared night vision. It is available in these sizes: 7 Inch Monitor w/ camera for rear bracket, 4.3 Inch Monitor w/ camera for rear bracket and 5 Inch.
The camera has a 180 degree angle of view and a transmission range that is close to 492 feet when set aside and tested for 50 feet at great speeds. It is perfect for travel trailers and it’s 2.4 gigahertz digital wireless technology offers clean, brilliant and unhindered live video without disconnecting.
It’s digital locking feature forestalls image loss or interference while driving at great speeds while the motion detectors make you aware of movements around your car. When parked, the auto alert monitor switch observation cameras to movement detecting ones and the mic on the doorway and rear security camera records sounds that makes it safe to backup.
You can see 40 feet of precise, clean and clear video coverage with the aid of your backup camera’s S technology even when the whole place is completely dark and rear assist marker lines allow you reverse carefully. You can easily see inconspicuous obstacles and blind spots when backing up.
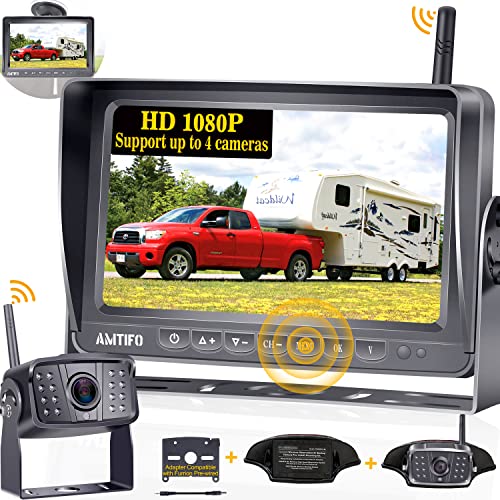
4. AMTIFO A8 HD Backup Camera
[su_button url=”https://www.amazon.com/dp/B07HC1KBT8?tag=bestpickshub1-20&linkCode=ogi&th=1&psc=1″ target=”blank” style=”flat” background=”#ef2d30″ size=”10″ center=”yes”]Check Price on Amazon.com[/su_button]
The AMTIFO A8 HD Backup Camera is a wireless camera that comes with a 7″ DVR Monitor and a rear view camera for trailers, 5th wheels and more vehicles. It has a 150 degree real angle of view and a 24 volts voltage rating.
The camera is waterproof with a standard of IP69 and a high and low temperature resistance of -22 degree Fahrenheit and 176 degree Fahrenheit. It can be setup quick and easy and for the camera as well as in-built monitor, you just connect the power source and the antennas to them. They then send video signals automatically.
When reversing, the digital HD Image will make you more relaxed and confident. Recording and playback will allow you see the road properly and remain safe when going to a camp. You can switch between cameras using the high-resolution touch screen monitor. Merging, tailgating and passing vehicles can be seen much easily.
The rear assist marker lines can also be turned on or off based on your needs. It will help you reverse carefully and with coverage close to the bumper, you can see inconspicuous obstacles and blind spots anytime you back up.
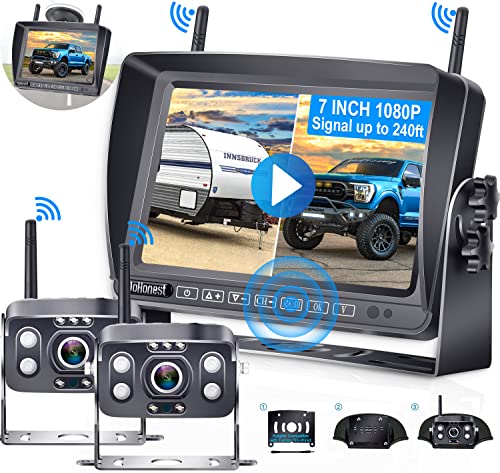
5. Halloview MC7108 Backup Camera

[su_button url=”https://www.amazon.com/dp/B07DKZR5FG?tag=bestpickshub1-20&linkCode=ogi&th=1&psc=1″ target=”blank” style=”flat” background=”#ef2d30″ size=”10″ center=”yes”]Check Price on Amazon.com[/su_button]
The Halloview MC7108 Backup camera is a wireless camera that comes with an in-built 7 Inch monitor and DVR Rear view camera with a large viewing angle for trailer, van and camping cars and infrared right vision.
This model is a huge improvement when compared to the MC7101. It has a longer transmission distance, stronger lens and enhanced image resolution that will offer a different driving experience. The image captured by the camera is often very clear and it features a 120 degree wide viewing angle that clears every blind spot which is necessary when backing up in dark places.
You will find the camera relatively easy to install and the pack has every required accessory or cable in it and an instruction manual to guide you. The manual is very easy and simple to understand whether you’ve handled such installation in the past or not. It takes just some minutes.
Its 720 HD image resolution enhances your viewing experience and the long monitor antenna accepts long range signal much better and the wireless signal can stand at a distance of 984 ft. The in-built SMART IR-CUT filter gives images more realness.
6. eRapta Backup Camera 2.0
[su_button url=”https://www.amazon.com/dp/B01J0RS8UM?tag=bestpickshub1-20&linkCode=ogi&th=1&psc=1″ target=”blank” style=”flat” background=”#ef2d30″ size=”10″ center=”yes”]Check Price on Amazon.com[/su_button]
The eRapta Backup Camera 2.0 comes with a monitor that works with tractors or trailers and has a backup when reversing or backing. To use the camera, you need to mount it on a surface and the device has a 36 volts voltage rating.
It’s wired backup system helps you get a brilliant image quality for you to feel safer and more confident when reversing. The waterproof camera has 18 ID lights and night vision & an advanced sensor. The sensor feature on the gadget gives you an extra view of trucks at the side or behind.
To charge your camera, you need to connect it to either a 12V or 24V DC power supply which is used in a vast number of large vehicles like 5th wheel, semi-trailer and more. It weighs 6.6 pounds and has an Item Model Number of ER0202. It is available in color black and was made in China.
You are likely to get a warranty on the product. The camera also has a 4 split screen as well as mirror and rotate function. You will find it easy to install and it prevents any blind spot when driving. It’s screen is 7 Inch in size.
Which is Better? Wired or Wireless Backup Camera?
A few travel trailers prefer wired backup cameras while others choose the wireless option. Sadly, the query does not give a direct response because it depends on your taste. If you haven’t used a Backup Camera for Travel Trailer before, you may not know what to go for. But knowing what differentiates them will help in making a decision.
The majority purchase wired backup cameras due to their performance. Their physical connection make videos have a more precise and stable quality. Yet, you should take note of how and where you will set the wiring. If you aren’t use to internal wiring, you might want to get a specialist who can provide a secure connection.
Or else, believe that it will take a little while to install the system. If you prefer not to stress yourself, then go for a wireless backup camera for your Travel trailer. Their connections work with the aid of a radio transmitter available in the gadget. Due to this, it may not seem like a real installation process because you won’t use a physical wire to connect your monitor yon the backup camera.
The disadvantage of this connection is dependability. Disruptions can lead to bad connections that gives low quality images. Bear in mind that a few cameras can receive signals from vehicles close by sending you their images rather.
Fortunately, improved technology provides strong connections and buying the latest models offer a more relaxed experience by reducing interference. Before buying any backup camera, always look at the pre-wired bracket at the back. The manufacturer’s name must be written and if it isn’t there, make sure you reach out to the company.
This will give you a 100% guarantee that you bought the right backup camera.
How to Install a Wired Backup Camera
Wired backup cameras gives a steady and clear picture in the long run which is why many believe them to be a better product. One other advantage of these cameras is that a power supply of their own is not needed compared to wireless cameras. All they need is a timely installation process longer than their wireless versions.
If you can and find it easy to remove some interior panels of your travel trailer to direct the wiring, mounting a wired Backup camera may be worth the while. These are the steps.
Installation Process
Firstly, you should know that finding time to make plans for the wired installation is important. You have to get a 3/4 inch drill bit, silicone sealant, power drill and two to four hours of your afternoon should do. The most vital decision will come when choosing where to fix the 60 ft cable.
Make sure the wire doesn’t come in contact with any pinch points or heat sources on its way. The cable can run across the roof or beneath your travel trailer. Based on your vehicle’s design, it might be more comfortable to run the cable beneath your flooring.
Put a mark on the spot you mount your camera on your travel trailer and disect the right sized hole. Make sure you don’t divide the fiberglass with your three quarter inch hole. Mount the backup camera and put the silicone sealant all over the mount for it to seal.
Run the wire via your hole to the front of your vehicle trailer and that connection may demand that you take out a seat, other equipment’s or a kick panel.
Place the monitor in a good location where your line of sight when driving won’t be disrupted. Over the rear view glass is the most traditional location for your monitor. Connect the wire to the monitor and that is all.